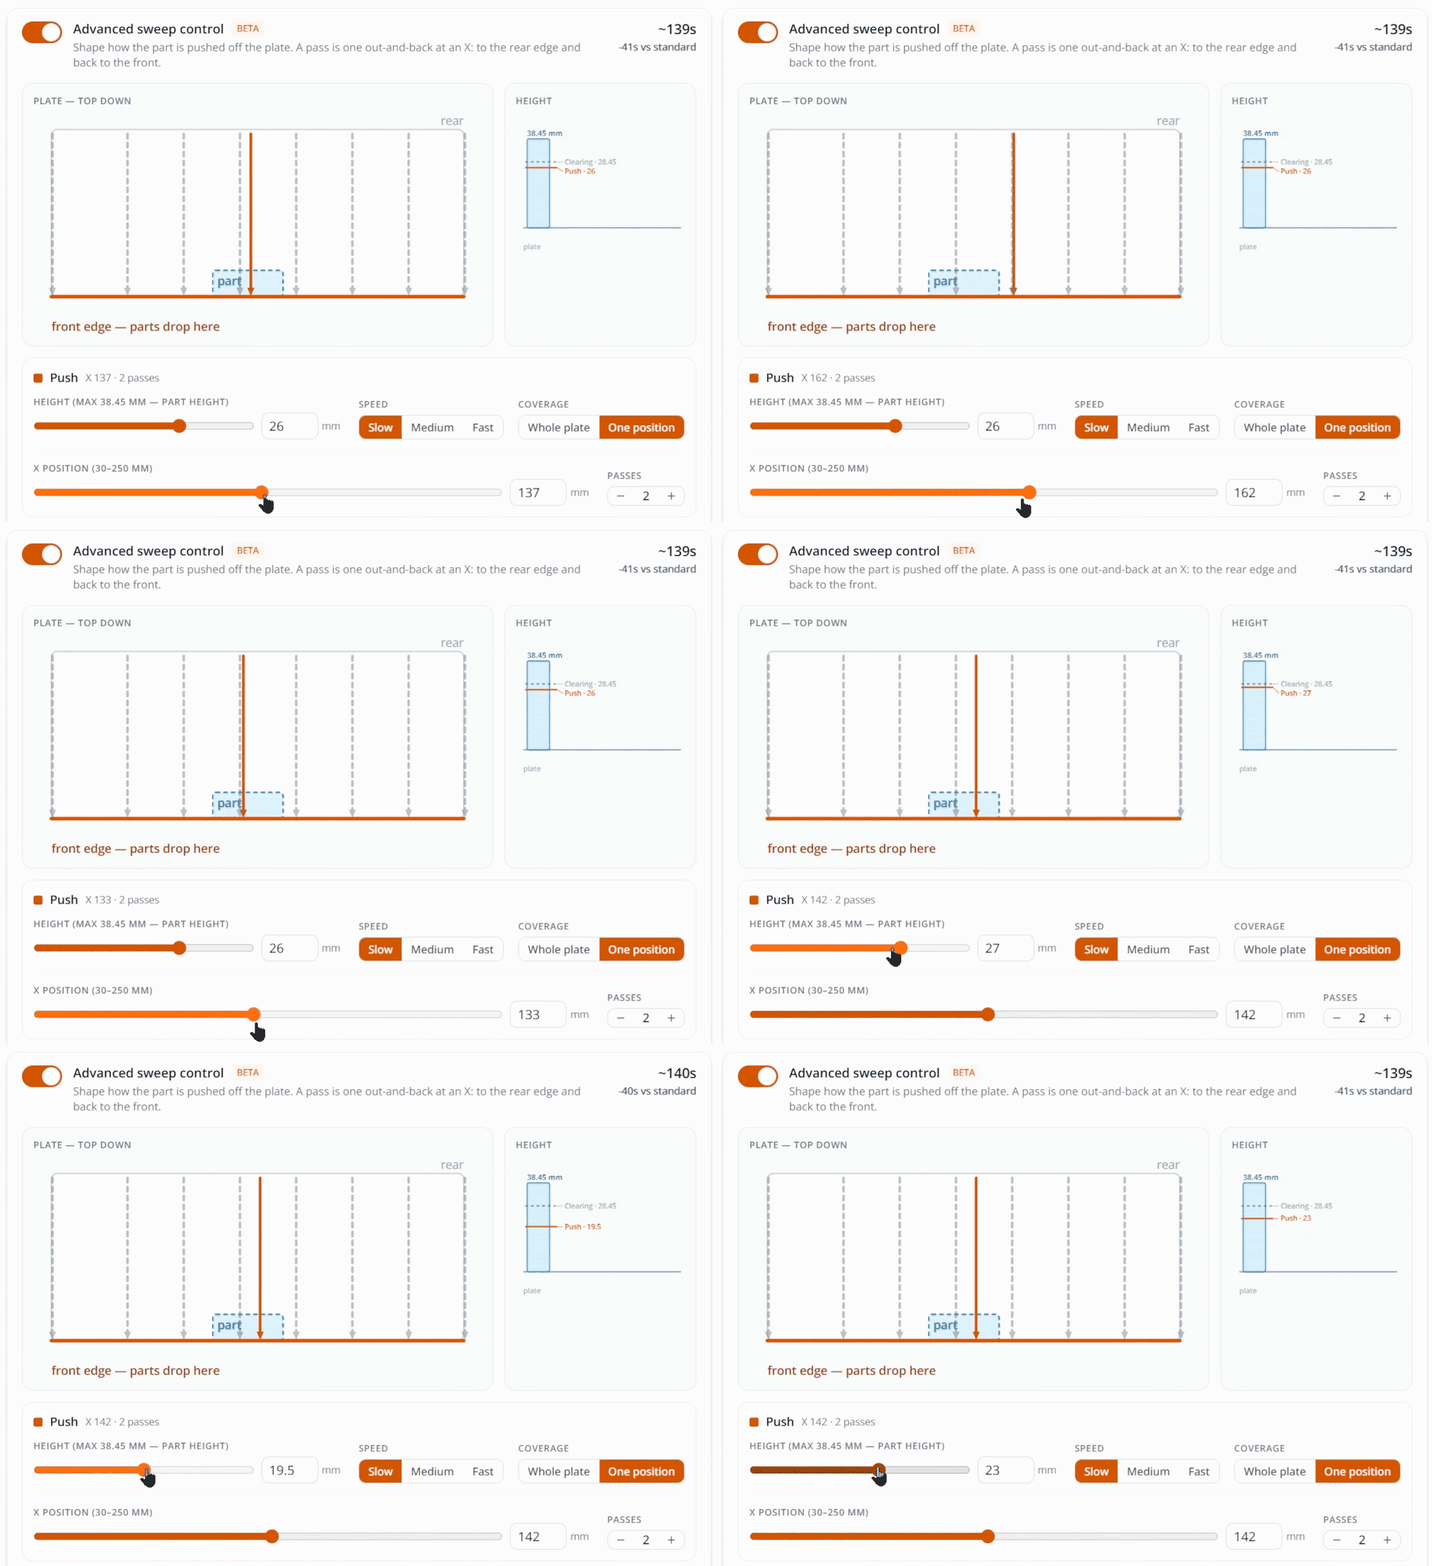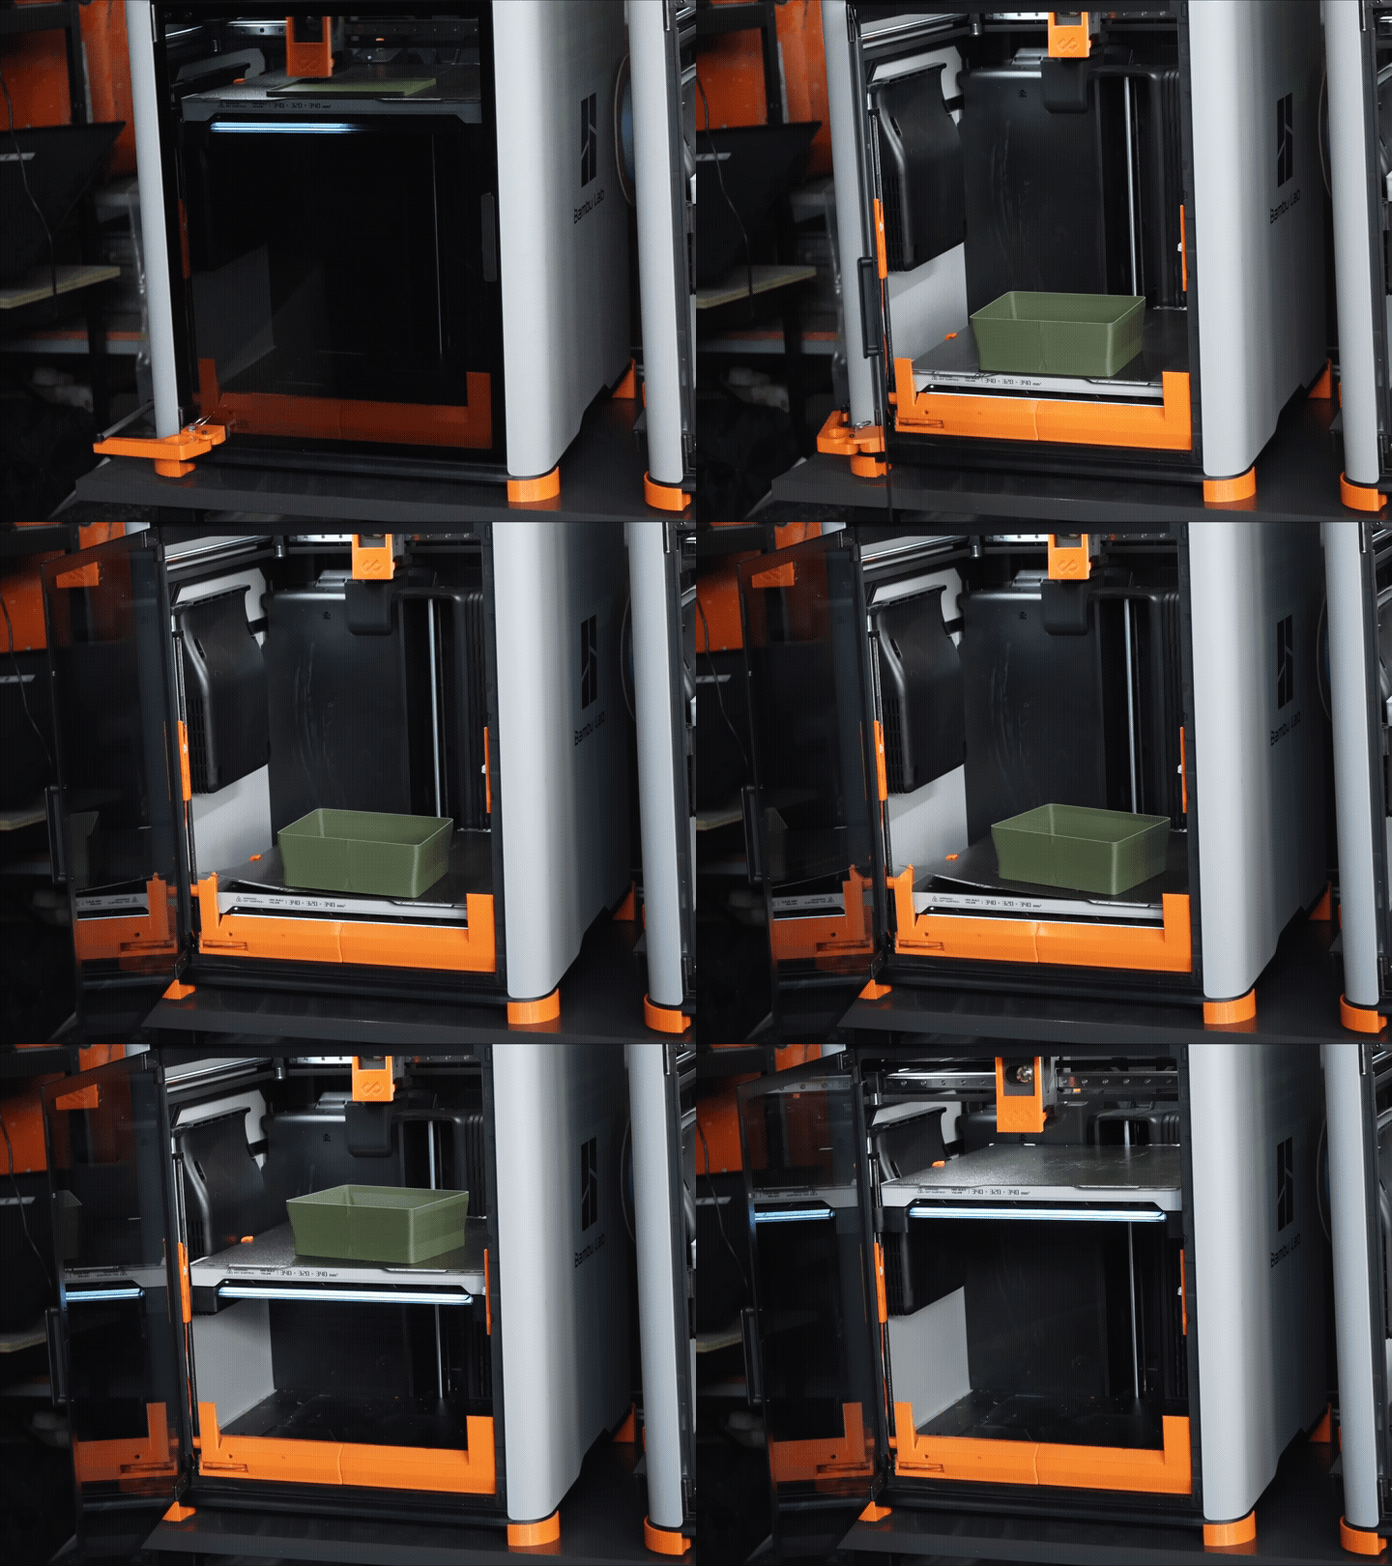


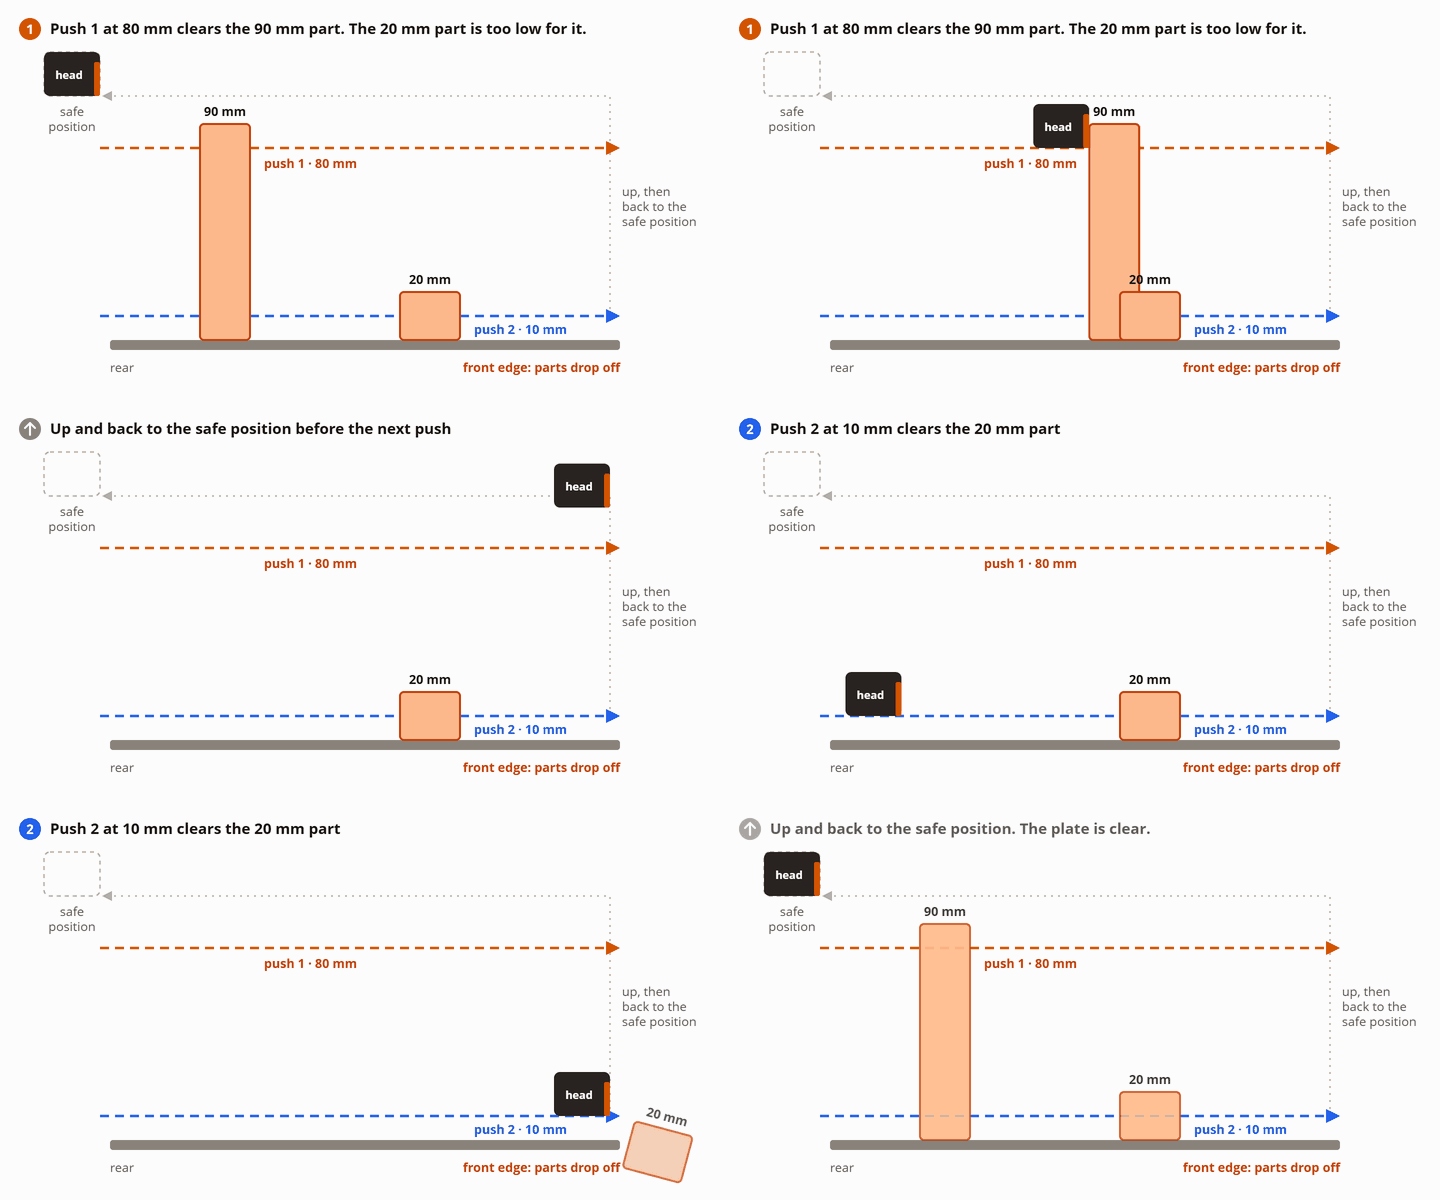
FarmLoop App 2.8 is out. In October we put three new tools into beta, and a lot of you ran them on real farms and told us what broke. Two of them are now regular features for Pro and Business: custom sweep control and trigger calibration. The price calculator leaves beta too. And because one farm wanted to run 250 loops off two AMS units, a single file can now hold up to 300 loops.
The newsletter had room for three paragraphs on this. Here is the long version, with the numbers you need to tune each feature.
TL;DR
- Custom sweep control (Pro and Business) replaces the single push that clears the plate with up to 6 pushes and 4 clearings, each with its own height, speed and coverage. Plates with tall and short parts now clear in one loop.
- Trigger calibration (Pro and Business, Stage 2) presses the kit's switch up to 3 mm deeper in 0.5 mm steps, for printers that stop just short of it so Stage 2 never starts.
- The price calculator is out of beta. The basic version is free for everyone, even without an account; Pro and Business get the full one with marketplace fees, shipping, discounts and Excel export.
- Up to 300 loops per file on Pro and Business, with a warning above 100.
- Z offset now works on Elegoo, Prusa, Snapmaker and Flashforge printers, and Prusa binary G-code (.bgcode) is accepted.
- Still in beta: bottom surface flow, the under-bed object check, natural cooldown, the prime blob on the Prusa Core One and the print quality report.
What changed in FarmLoop App 2.8
| Feature | Status in 2.8 | Plans |
|---|---|---|
| Custom sweep control | Regular feature (was beta) | Pro, Business |
| Trigger calibration | Regular feature (was beta) | Pro, Business |
| Price calculator | Regular feature (was beta) | Basic: everyone. Full: Pro, Business |
| Up to 300 loops per file | New | Pro, Business |
| Z offset on Elegoo, Prusa, Snapmaker, Flashforge | New | Pro, Business |
| Prusa binary G-code (.bgcode) | New | Prusa Core One files |
| Bottom surface flow, under-bed object check | New, beta | Pro, Business (Beta features switch) |
| Natural cooldown, prime blob, print quality report | Still beta | Pro, Business (Beta features switch) |
Custom sweep control: clearing plates with tall and short parts
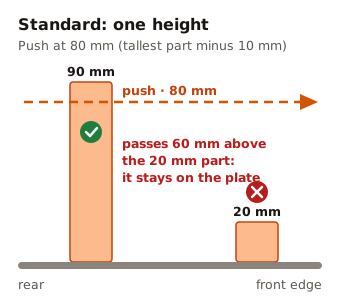
The problem. After the cooldown and the bend, FarmLoop pushes the finished parts off the front edge of the plate. The standard push runs at one height: the tallest part on the plate minus 10 mm (minus 20 mm on the H2S, H2D and H2C). On a plate with a 90 mm part and a 20 mm part, that push runs at 80 mm. It clears the tall part and passes 60 mm above the short one, which stays on the plate. And a part that stays on the plate is the one thing an unattended farm cannot afford.
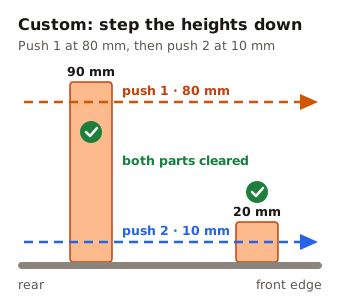
How a routine is built. A routine is a list of pushes followed by clearings. A push is the first contact with the parts; a clearing is a follow-up rake that catches what the pushes left behind. Every push and every clearing gets its own card with three settings:
| Setting | Choices |
|---|---|
| Height | 0.5 mm up to the tallest part on the plate, in 0.5 mm steps. Blank uses the file's push height. |
| Speed | Slow, Medium, Fast (50, 100 and 200 mm/s) |
| Coverage | Whole plate (one pass in every lane), or One position (every pass in one lane you pick on a slider, 1 to 10 passes) |
In the app you can add up to 6 pushes and 4 clearings. Business accounts can send up to 10 pushes and 5 clearings over the Processing API. Switch the control on and change nothing, and you get exactly the standard routine: one push of 2 passes at mid-plate, then a slow and a fast whole-plate clearing.
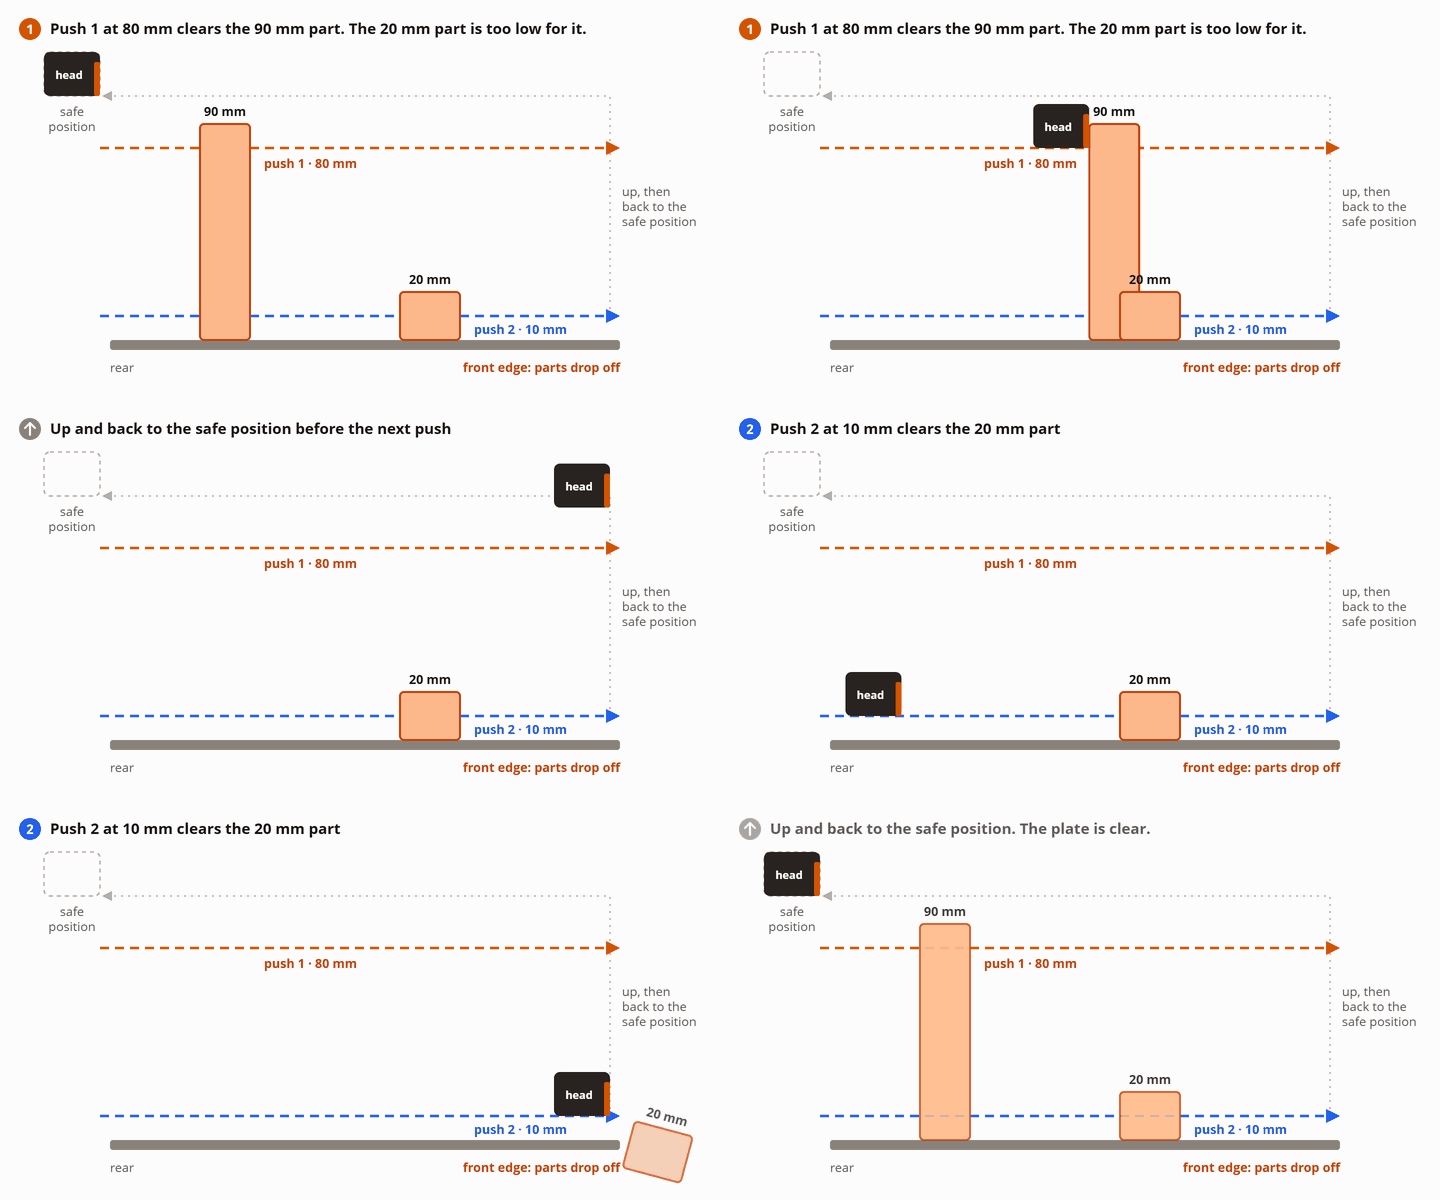
Why a lower push never hits a part. Before every push or clearing the head goes up to the printer's top sweep height, travels back to its safe position and only then comes down to the next height. Every pass starts at the rear edge and pushes forward, so the head never drives along the front edge where the parts drop off.
A worked example. A P1S plate with one 90 mm part and four 20 mm parts:
- Switch on Custom sweep control and set the push to Whole plate. Leave its height blank: the file's push height is 80 mm.
- Click Add push. The new push starts at 40 mm; set it to 10 mm.
- Set both clearings to 10 mm too. Left blank, they run at the file's push height and pass over the short parts.
- Check the preview, which draws the path over your actual plate and shows the extra cycle time (for example "+12s vs standard"), then watch the first loop.
Keep pushes at 2 mm or higher: below that, a Z skip under load can drag the nozzle across the plate. The app recommends at least 5 mm.
Where: Detachment tuning step, Detachment Mode card, Advanced controls, Custom sweep control. Pro and Business, push mode, Stage 1 and Stage 2. It works on the Bambu Lab A1 and A1 mini in push mode, the P1P, P1S, P2S, X1C, X1E, X2D, H2S, H2D and H2C, the Elegoo Centauri Carbon, the Prusa Core One, the Snapmaker U1 and the Flashforge AD5X. The full reference, including lanes and height limits per printer, is in the help center: Custom sweep control.
Trigger calibration: for the Stage 2 that silently never starts
The problem. Stage 2 starts when the printer presses the FarmLoop kit's switch. On the Bambu Lab P, X and H series and on the Elegoo, Prusa and Snapmaker printers the bed moves down onto it; on the A1 and A1 mini the gantry rises into it. If the kit sits a fraction low, or the plate is a little thinner, the printer stops just short. The print finishes, there is no click, the door does not open, the bender does not run. No error either. And it happens on every print, not once in a while.
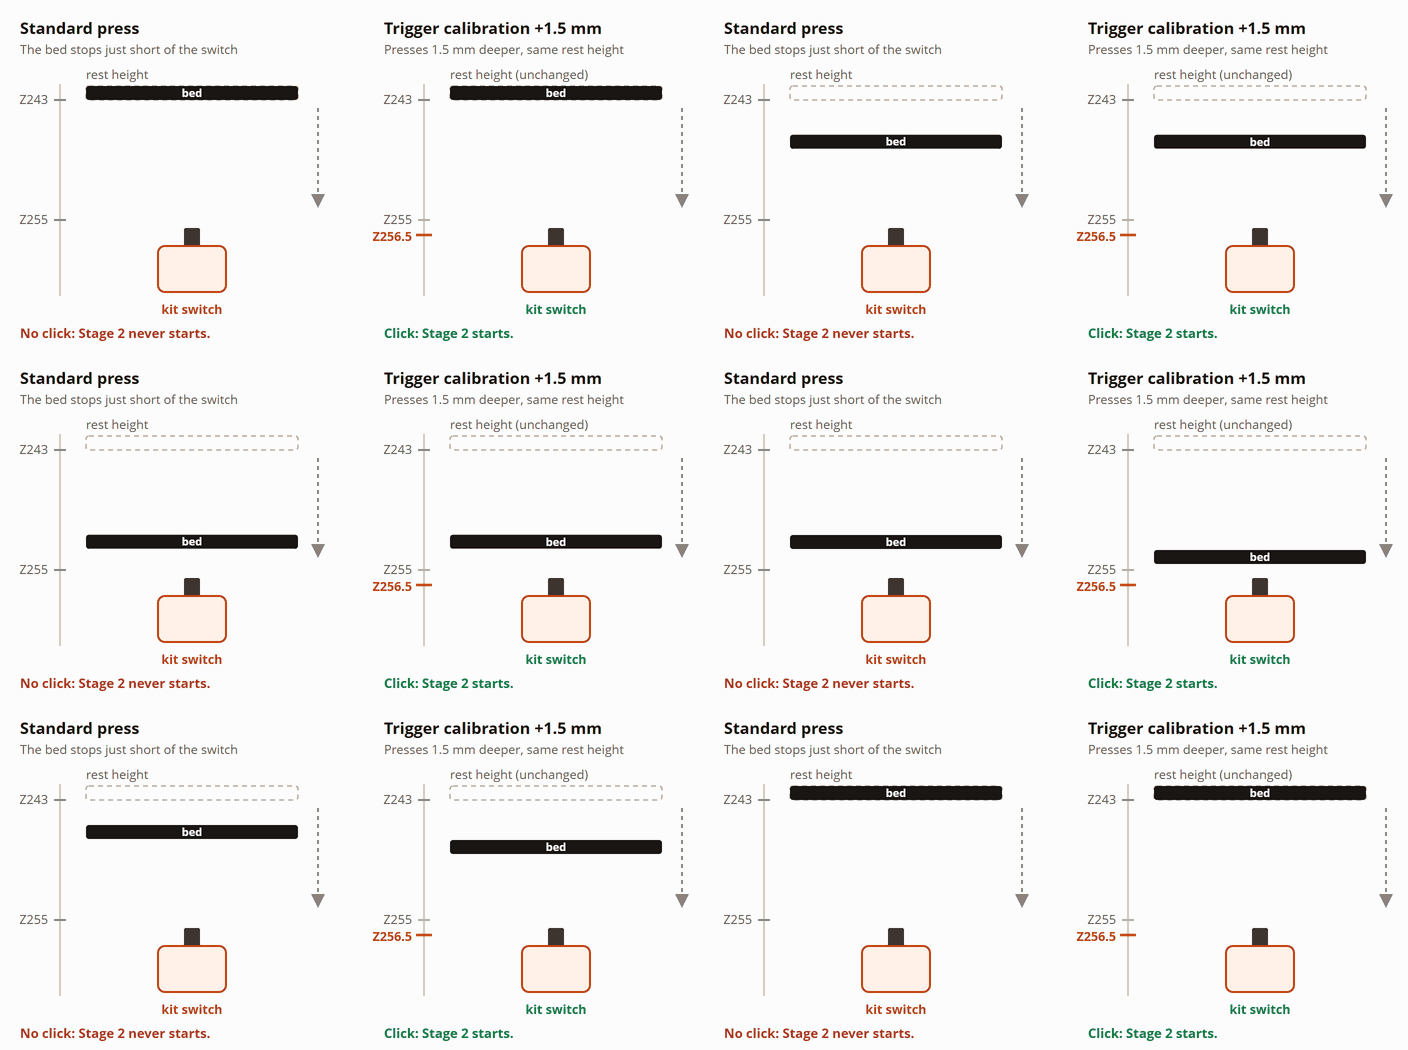
What it changes. Every press of the switch goes deeper by the amount you set, from 0 to 3 mm in 0.5 mm steps. The rest height stays where it is, so the stroke gets longer instead of the whole movement shifting. On a P1S at 1.5 mm, the bed goes Z243, down to Z256.5, back to Z243, instead of Z243, Z255, Z243. The app shows the new press height under the slider. Nothing else changes: not the Stage 1 bending, not the sweep.
| Printer | Standard press | At +3 mm |
|---|---|---|
| Bambu Lab P1P, P1S, P2S, X1C, X1E | Z255 | Z258 |
| Bambu Lab X2D | Z260 | Z263 |
| Bambu Lab H2S | Z340 | Z343 |
| Bambu Lab H2D, H2C | Z325 | Z328 |
| Bambu Lab A1 | Z256 | Z259 |
| Bambu Lab A1 mini | Z185 | Z188 |
| Elegoo Centauri Carbon | Z255 | Z258 |
| Prusa Core One | Z273 | Z276 |
| Snapmaker U1 | Z266 | Z269 |
How to set it:
- Check first that the switch sits flush in its holder. A loose switch moves during the print, and pressing deeper does not fix that.
- Set 0.5 mm in Trigger Calibration.
- Process the original sliced file again, not the FL_S2_ file you made before.
- Stay at the printer when the first print ends: you should hear the switch click and see the door open.
- Raise it in 0.5 mm steps only if the switch still does not click.
The press goes past the highest point FarmLoop normally moves the printer to, so use the smallest value that works and watch the first run. Where: Detachment tuning step, Tuning Parameters, under Heated Bed Temperature. Pro and Business, Stage 2 only. Full reference: Trigger calibration.
The price calculator leaves beta
The price calculator works out what one print really costs you, from material, machine time, electricity, labour and failed prints, and turns that cost into a selling price with the margin you want. Worth a run before you set your own Black Friday prices.
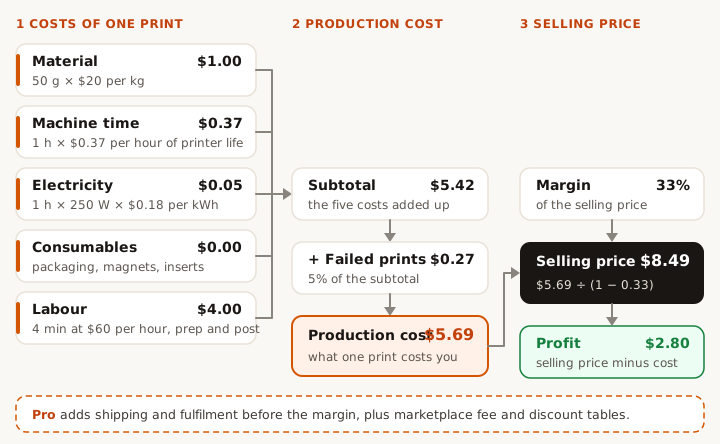
Two things most spreadsheets get wrong, and the calculator does not:
- Margin, not markup. The margin is the share of the selling price that is profit: price = production cost ÷ (1 - margin). At 33%, a production cost of $5.69 gives $8.49. A 33% markup would give $7.56, and you would earn less than you think.
- Loops spread the preparation. You prepare the file once and clear the finished batch once, so the calculator splits model prep, slicing and job removal over the loops. In the default example, going from 1 to 10 loops drops labour from $4.00 to $2.20 per print and the selling price at 33% from $8.49 to $5.67. That is the business case for automation in one number.
| Free page | App, Lite | App, Pro and Business | |
|---|---|---|---|
| Cost summary, margin, selling price, profit | Yes | Yes | Yes |
| Print time and filament filled in from your file | No | Yes | Yes |
| Your own printers and materials | No | View only | Yes |
| Shipping and fulfilment costs | No | No | Yes |
| Marketplace fees (Shopify, Etsy, eBay, Amazon) | No | No | Yes |
| Discount analysis (0 to 50% off) | No | No | Yes |
| Excel export and import | No | No | Yes |
Up to 300 loops per file
The loop limit used to be 99 per file. Laurentio runs 8 spools of the same colour across two AMS units with auto-refill, and planned about 250 loops, roughly 8 kg of parts, in one unattended job. At 32.11 g per part, our cap stopped him at 3.18 kg with more than half of the filament still loaded. He was the first person ever to ask us to raise it, and you only ask for loop 250 when the first 99 never needed you.
So in 2.8 a single file can hold up to 300 loops on Pro and Business. Above 100 the app shows a warning. Thanks for pushing us, Laurentio.
Z offset for Elegoo, Prusa, Snapmaker and Flashforge
The Z offset sets how far the nozzle stays from the plate on the first layer. More positive means more gap, less squish and an easier release; too high and the first layer does not hold. Bambu Lab printers already had it; 2.8 adds it for Elegoo, Prusa, Snapmaker and Flashforge. The number means something different depending on the brand:
- Bambu Lab: the value is the Z offset itself and replaces the one Bambu Studio sliced in. Bambu's stock value differs per printer (P1P, P1S, X1C -0.04 mm; A1 and A1 mini -0.02 mm; X2D and P2S +0.02 mm), so +0.02 changes nothing on an X2D or a P2S.
- Elegoo, Prusa, Snapmaker, Flashforge: the value is added on top of the printer's own offset. 0 prints exactly as sliced. If parts stick, try +0.02 mm first, up to +0.04 mm. Only the print moves; the purge, the switch presses and the sweep keep their heights.
The per-printer ranges are in Parts won't detach and the full reference in Z offset.
Prusa binary G-code
Prusa Core One users can now upload .bgcode files straight from PrusaSlicer. They go into the app and come back as plain G-code, ready for the printer.
Still in beta
These are off by default. Pro and Business accounts switch them on with the Beta features toggle in the app footer, and off again at any time.
- Bottom surface flow (new): puts a little less plastic into the first layer's bottom surface, so parts grip the plate less. Farms report that 1.05 sticks hard and 1.00 or a little below pops off. Range 0.90 to 1.00, default 0.97; walls and supports stay as sliced. Frank brought us this idea. How it works.
- Under-bed object check (new): on the P2S, X2D, H2S, H2D and H2C, the printer runs Bambu's own bed-underside check before every deep bed move and stops with an error if a fallen part is under the bed, instead of crashing into it. Osazee brought us this one.
- Natural cooldown: door shut and fans off for the minutes you choose before Stage 2 opens, so ASA, ABS and PC cool evenly. Enclosed P, X and H printers.
- Prime blob on the Prusa Core One: a small blob instead of the purge line.
- Print quality report: a read-only check of a sliced file for quality risks, cost and speed headroom.
Fixes in 2.8
- The fans now run during the cooldown on the X2D, P2S and H2 printers.
- The sweep returns to its safe position between stages.
- Snapmaker, Elegoo and Prusa: the kit gets the full 85 s to bend in Stage 2.
- Smaller fixes to the support base, the queue and the progress feedback.
Black Friday: 20% off all Stage 2 kits
From 13 November to 1 December (US time), all six Stage 2 kits are 20% off: P and X Series, A1 and A1 mini, H Series, Prusa Core One, Snapmaker U1 and Elegoo Centauri Carbon. No code needed, the sale price is right on the kit page. It stacks with our bulk discount (5% from 5 items, 10% from 10 items) and with the 15% kit discount on the annual Business plan.
Frequently Asked Questions
What is new in FarmLoop App 2.8?
FarmLoop App 2.8 makes custom sweep control, trigger calibration and the price calculator regular features, raises the loop limit to 300 loops per file, adds a Z offset for Elegoo, Prusa, Snapmaker and Flashforge printers, and accepts Prusa binary G-code. Bottom surface flow and an under-bed object check are new betas.
Which FarmLoop plan do I need for custom sweep control and trigger calibration?
Pro or Business. On the free Lite plan the custom sweep control card is greyed out with "Pro only", and Lite does not see the Tuning Parameters where trigger calibration lives.
How do I clear tall and short parts from the same plate automatically?
With FarmLoop custom sweep control, add a second push lower down: for example a first push at 80 mm for a 90 mm part, then a push at 10 mm for the 20 mm parts, and set the clearings to 10 mm as well. The head returns to its safe position between pushes, so a lower push never drives into a part that is still standing.
Why does my FarmLoop Stage 2 not start after the print finishes?
Usually the printer stops a fraction of a millimetre short of the kit's switch, so it never clicks and nothing happens, with no error. First check that the switch sits flush in its holder, then use trigger calibration: start at 0.5 mm, process the original file again and watch the first run.
Is the FarmLoop price calculator free?
The basic price calculator is free for everyone at app.3d-farmers.com/calculator, even without an account. Pro and Business get the full version with shipping and fulfilment costs, marketplace fees for Shopify, Etsy, eBay and Amazon, a discount table and Excel export.
How many loops can one FarmLoop file run?
Up to 300 loops per file on Pro and Business since FarmLoop App 2.8, up from 99. The app shows a warning above 100 loops.
Which Z offset should I use on a Bambu Lab printer?
Start from Bambu's stock value for your printer and go up in 0.02 mm steps if parts stick: on a P1S, X1C or P1P the range is 0.00 to +0.04 mm, on an A1 or A1 mini +0.02 to +0.06 mm, on an X2D or P2S +0.06 to +0.10 mm.
Wrap-up
2.8 is the release where your beta testing paid off: the mixed plate that never fully cleared, the Stage 2 that silently never started, and the pricing spreadsheet that confused margin with markup. Open the app, try it on your next job, and if something is missing, post it in #feature-requests on our Discord. That's where the next round comes from.
– Yanyan